|
|
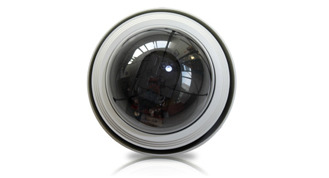
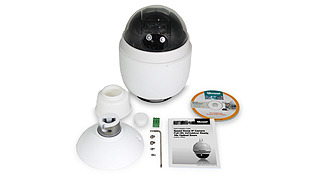
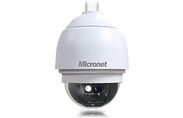
1080p Full HD WDR High Speed PTZ Dome IP Camera
Model No. SP5923
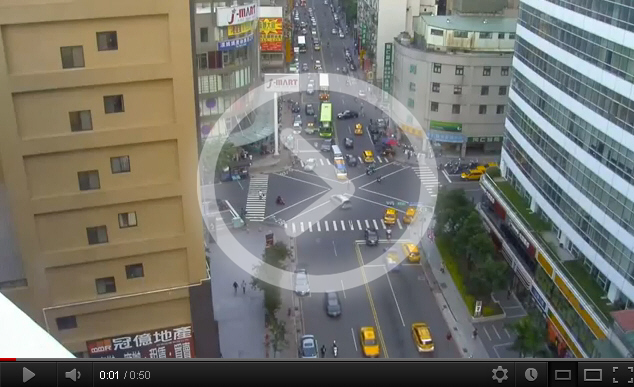
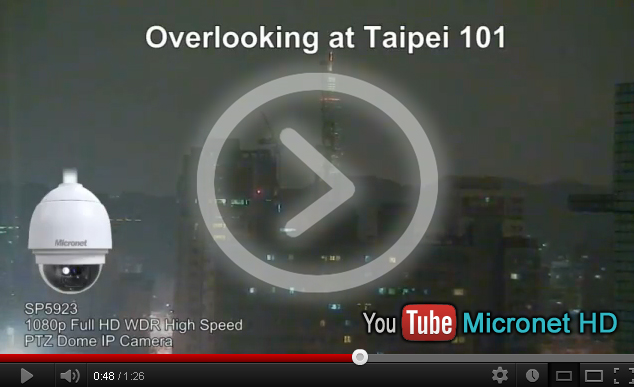
Micronet SP5923 Full HD Speed Dome IP Camera is equipped with high quality SONY progressive scan CMOS sensor. Due to its HDTV 1080p performance and auto-focused 18x zoom lens, Micronet SP5923 provides an exceptional level of detail in zoomed-in images. In addition, the SP5923 does not only provide the extra advantage of a wider, 16:9 field of view, but also is outdoor ready, weather-proof, IP66-related, and supports up to 60 fps in HDTV 720p, delivering perfect video for the capture of quick movements. Micronet SP5923 can automatically move, very fast at up to 400° per second, to a preset position to capture and identify the objects. For instance, to capture and identify a vehicle license plate or a human face as the motion is detected in a pre-defined area. With its powerful video processing capability, Micronet SP5923 Full HD Speed Dome IP Camera can deliver real-time, H.264, dual streams, 1080p and D1, at 30 frames per second, where H.264 compression technology greatly optimizes bandwidth and storage usage without compromising the image quality.
Micronet SP5923 Full HD Speed Dome IP Camera supports day-and-night function and adopts digital noise reduction technology, which could effectively reduce environment noise, to assure optimal video quality, especially at night time. Moreover, the SP5923 provides WDR (Wide Dynamic Range) feature to make it possible for excellent visibility of objects in any challenging lighting conditions that the dark and the bright areas co-exist in a scene. With 360° endless pan and -10 ° ~ 190° tilt, the SP5923 is robustly built for constant pan/tilt/zoom movements and supports a tour recording functionality that makes it easy to set up automatic guard tour operations.
Compatible Video Management Software:
Overview
- 1/2.8" SONY Progressive Scan CMOS Sensor
- Real Time Dual Streams, 1080p + D1 @ 30fps
- Quad Streams with Region of Interest (ROI) support
- H.264 (High Profile) and MJPEG Compression
- 18x Optical Zoom, 12x Digital Zoom
- Motion Detection
- Privcy Mask
- WDR
- Auto Tracking**
- Smart Picture Quality/3DNR
- Tampering Alarm
- Day/Night (Removable IR-Cut Filter)
- Micro SD Support*
- Auto Iris, Auto Focus
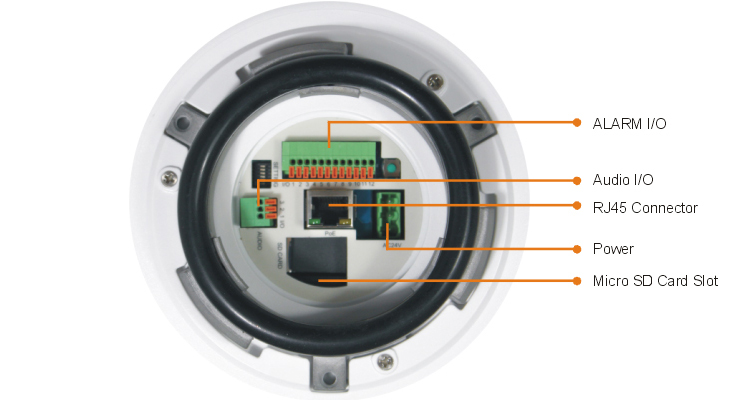
- 4 Digital Alarm Inputs, 2 Alarm Outputs
- Weatherproof (IP66 International)
- Sunshield
- High Power PoE (802.3at) Compliant
- Built in Heater & Fan (Requires AC24V power adapter to activate)
- ONVIF Support
- *No SD/SDHC Card Slot & Local Storage Function for Argentina
- **Optional Firmware Available
Specification
| Model |
SP5923 |
| Video Sensor |
1/2.8" Progressive Scan CMOS |
| Video Lens |
f=4.7-84.6mm F1.4 18x Optical Zoom |
| FOV |
Wide: 67.3゚(D) / 55.2゚(H) / 42.1゚(V)
Tele: 4゚(D) / 3.2゚(H) / 2.4゚(V)
|
| Video resolution |
HD1080p/HD720p/D1/VGA/CIF |
| Video compression |
H.264/MJPEG |
| LAN |
10/100M |
| Protocol |
IPv4/v6, TCP/IP, UDP, RTP, RTSP, HTTP, HTTPS, ICMP, FTP, SMTP, DHCP, PPPoE, UPnP, IGMP, SNMP, QoS, IEEE 802.1X, ONVIF |
| Power Source |
PoE Plus/High PoE (802.3at) 24V AC |
| Power Consumption |
20W
65W (heater on) |
| Dimensions (mm) |
Ø191.97 x 282.11
|
| Certification |
CE, FCC, RoHS |
| Weight |
2320g |
Ordering Information
SP5923: 1080p Full HD WDR High Speed PTZ Dome IP Camera
C5230: Standard Wall Mount Kit
C5231: Mini Wall Mount Kit
C5232: Short Pendant Mount Kit
C5233: Long Pendant Mount Kit
M5503: Power Adapter 240V AC24V 3.5A
M5504: Power Adapter 110V AC24V 3.5A
Videos
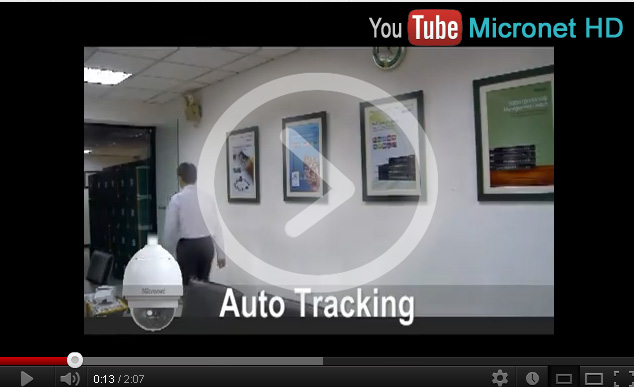
Auto-tracking function could be activated with a license key. This add-on intelligent function will bring more benefit and convenience to the users of Micronet IP speed dome cameras. Please kindly contact us for more information.
Key Features
1.Built-In Video Intelligence Program
2.Activate with License Key
3.Adjustable Maximum Tilt and Pan Angle
4.Adjustable Detection Area Percentage
5.Home Function Support
6.Guard Timer Setting
P/T/Z Speed Dome Camera
Features |
|
Megapixel/HDTV |
2MP / 1080p |
Sensor |
1/2.8"
Progressive Scan
CMOS |
Lens |
f=4.7-84.6mm F1.4 |
Optical Zoom |
18x |
Pan/Tilt |
360° endless
/-10°~190°
(400°per second) |
Iris Control |
Yes |
Day/Night |
Yes |
LED Illumination |
- |
Min Illumination |
Color:0.3 lux
B/W:0.04 lux |
Max Video Resolution |
1920x1080(1080p) |
Max Frames Per Second |
1920x1080@30fps
1280x720@30fps |
Video Compression |
H.264(High Profile)/ MJPEG |
Multiple Streams |
4 Streams |
Wide Dynamic Range (WDR) |
Yes |
Networking |
10/100 Ethernet |
Power Source |
PoE Plus (802.3at)
AC 24V |
Digital In/Out |
4/2 |
Audio In/Out |
3.5mm/3.5mm |
BNC Video Output |
- |
Memory Card Slot* |
MicroSD/SDHC
up to 32GB |
Operating Temperature |
-40~50°C |
Weather Proof |
IP66 |
ONVIF test tools |
Yes |
Value Added |
-Region of Interest(ROI)
-Back Light Compensation(BLC)
-SPQ/3D Noise Reduction
-Privacy Mask
-Tamper Detection
-Network Failure Detection
-Built-in Heater & Fan |
Select features to include in PDF
Click browse answers to questions
"DDNS stand for Dynamic Domain Name System. It serves a similar purpose to DNS. DNS is an Internet service that translates domain names into IP addresses. Every time when a user uses a domain name to connect to the Internet, the DNS server will translate the name into the corresponding IP address.
For example, the domain name www.example.com might translate to 198.105.232.4. Unlike DNS that only works with static IP addresses, DDNS works with dynamic IP addresses which assigned by an ISP or other DHCP server periodically and keep a domain name linked to a changing IP address. To use DDNS, you must first apply an account from several free Web DDNS servers such as www.dyndns.org and installs network software on the host. The host will contact the DDNS service each time the IP address provided by the ISP changes and DDNS server updates the DNS database to reflect the change in IP address.
In this way, even though a domain name´s IP address will change often, other users do not have to know the changed IP address in order to connect with the other computer."
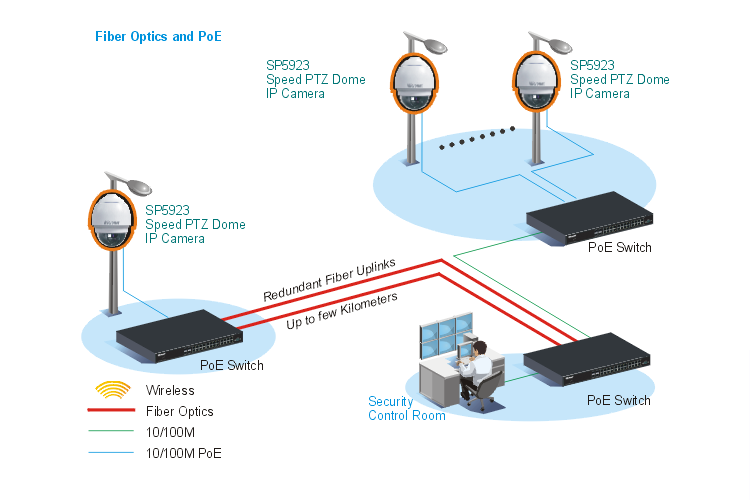
Power-over-Ethernet (PoE) eliminates the need to run power to devices on a wired LAN. Using Power-over-Ethernet, installers need to run only a single CAT5/5e Ethernet cable that carries both power and data to each device. This allows greater flexibility and significantly decreases installation costs in many cases.
IEEE 802.3af standard-2003 ratified at June 12, 2003. Power over Ethernet/LAN
1. Transmits low power on the Cat. 5 or 5e TP cable.
2. 44V-57V, 48V DC widely used
3. 350mA maximum,
4. 15.4W maximum per port output
5. 12.95W input deduced power lose on cable distance.
How do I set up IP camera with DDNS and view from my iPhone?
2. Login to camera's web UI and configure the DDNS settings
(Please check out the below video tutorial on youtube channel - MicronetHD)
3.Download Micronet NetView from Apple App Store
(Please check out the below video tutorial on youtube channel - MicronetHD)
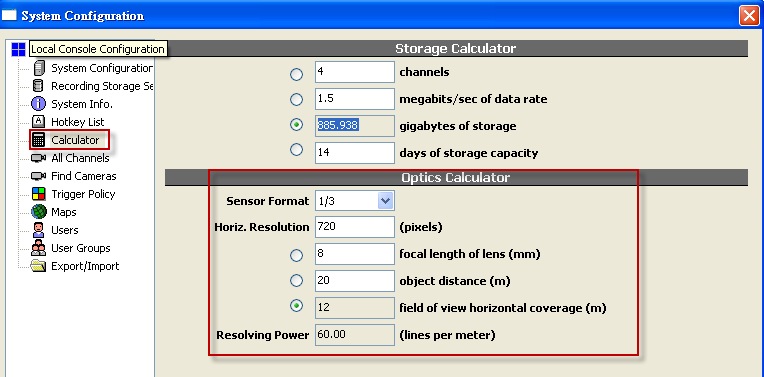
How to calculate available FOV (Field of View) width of an IP camera with MicroView?
MicroView™ provides a built-in design tool, allowing a user to estimate the FOV's width of the network camera based on sensor format, resolution, focal length and object distance.
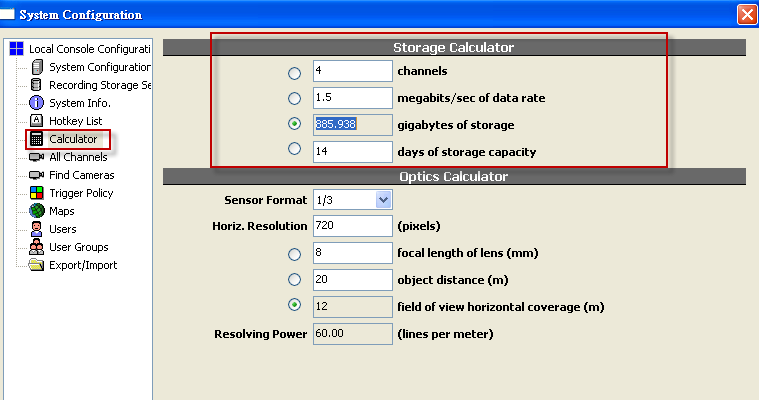
How much storage space is required for specific recording days?
MicroView™ provides a built-in design tool, allowing a user to estimate required storage space based on the number of network camera, data rate and recording day.
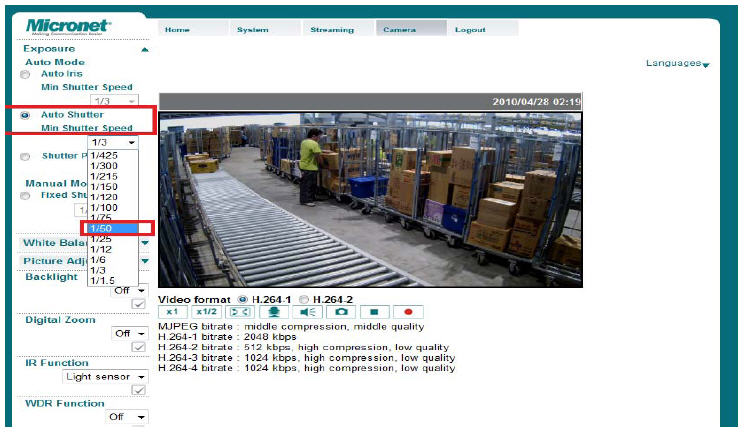
How can I adjust my IP cameras, SP5563/SP5582/SP5584/SP5591, to get clear images for moving objects?
In the camera's web interface, go to Camera>Exposure>Auto Shutter, appropriately chooing "Min Shutter Speed" according to lighting conditions at fields.
What should I do my IP Camera as no video due to ActiveX is not the latest version?
1, SP5532/SP5220: ACTIVE X error message as below,
Firstly, please remove old ActiveX control," IPCamPlugDM.ocx ", at Window's “Downloaded Program Files”.
And then, connect to the camera, installing up-to-date ActiveX control as prompt.
2, SP5591/SP5584/SP5563/SP5584 series, SP5593, pleaser uninstall the "DCVIEWER" software
What is the power consumption of Micronet's IP cameras?
Please find maximum power consumption regarding Micronet professional network cameras as below.
| Model |
Power Consumption |
| SP5923 |
20W; 65W (w/ heater on) |
| SP5591A |
5W; 8W (w/ IRLED on) |
| SP5584A |
3.5W |
| SP5582A |
5W; 8W (w/ IRLED on) |
| SP5563A/R/BR |
4W |
| SP5319 |
7.5W |
|
SP5220P
SP5591K
SP5582K
|
4.7W
2.5W; 3.8W (w/ IRLED on)
3.8W; 5.8W (w/ IRLED on)
|
What is the difference between PAL and NTSC?
PAL and NTSC are both standards for the encoding of color television signals into a single wire. They were developed in the 1950s and have remained unchanged ever since. Although they both do the same job, there are some significant differences in the way they do it. Both standards refer only to standard definition signals.
NTSC commonly is used to describe a television signal that is made up of 535 lines per frame and with a frame rate of 29.97Hz. The active number of lines to make up the image is 480, with the remaining lines being hidden.
PAL is the common description for a signal that is 625 lines (576 active lines) and with a frame rate of 25Hz.
Conversion between NTSC and PAL is relatively straightforward. Conversion between 480 line and 576 line is far more complex as is the conversion between 25Hz and 29.97Hz. A full conversion will change the color encoding, the number of lines and the number of frames per second.
For SP5923, is it ok to have it work with high-power PoE switch at very low temperature with heater is on?
For scenarios that shall not require to turn on heater, the SP5923 can work with high-power PoE (802.3at) Switch.
Otherwise, the SP5923 must be provided with power with a power adapter in order to gain more power to turn on its heater. (Please refer to accessory for SP5923.)
How to watch camera of SP55XXHTM or SP55XXA/SP5582K/SP5591K with android or VLC player?
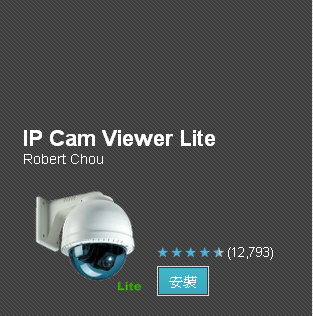
For Android user, you can download the App, IP Cam Viewer Lite, from Google Play, install it, add camera step by step and watch the camera as done.
For VLC player user, please follow the steps as below.
_1.png)
_2.png)
Note:
(a) To access the 1st stream of the camera, the URL will be
rtsp://[Camera’s IP address]:[RTSP port]/h264
For example, rtsp://192.168.1.2:554/h264
(b) To access the 2nd stream of the camera, the URL will be
rtsp://[Camera’s IP address]:[RTSP port]/h264_2
For example, rtsp://192.168.1.2:554/h264_2
I cannot found the iPhone/Android apps in itunes store. Please advise.
To view from iPhone/Android, please go to Apple store or Android play store to download the APP.
1, "IP Cam Viewer Pro" for iPhone and "IP Cam Viewer Lite" for Android, to support more camera models.
2, For the SP5736P APP,"NetGuard" for iPhone and "DroidGuard" for Android,
Why my IP Camera is successfully connected NVR(SP5736P), but there is no images?
1. Check the IP camera is SP5582A/SP5584A/SP5591A/SP5563A/SP5923 latest firmware version or ONVIF test tools v12.12. Other brand IP camera is not supported.
2. Make sure the streaming type is H.264. Other formates are not supported.
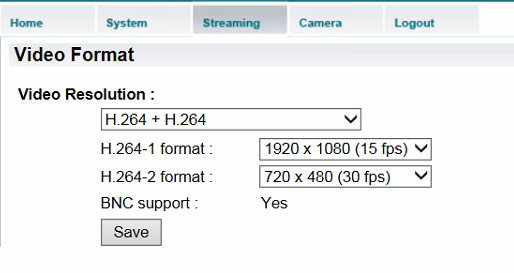
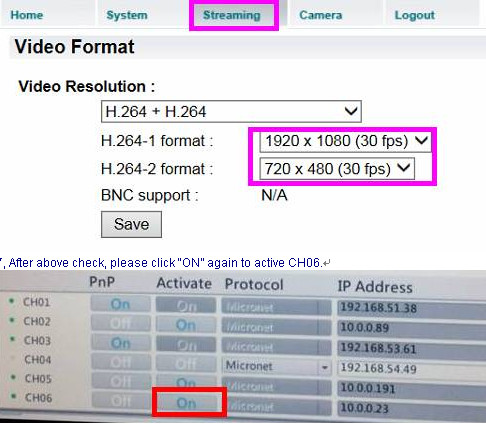
3. Check the resolution of Main/Dual Stream: MainStream=1080P, SecondStream=720P.
Can you inform how to configure the system SP5736P that the camera must directly connect from internet?
A, Currently the NVR SP5736P do support the connect directly to the IP camera WEB UI if the configuration as figure 1, our RD has add port forwarding feature into the NVR and let you do camera setting within NVR itself. (Please upgrade the SP5736P firmware to "40815" and download via ftp://220.128.111.185/IPS/SP5736P%20FW/40815/ u:betty p:micronet )
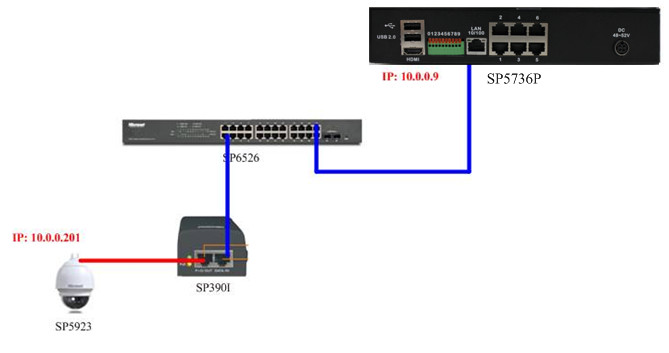
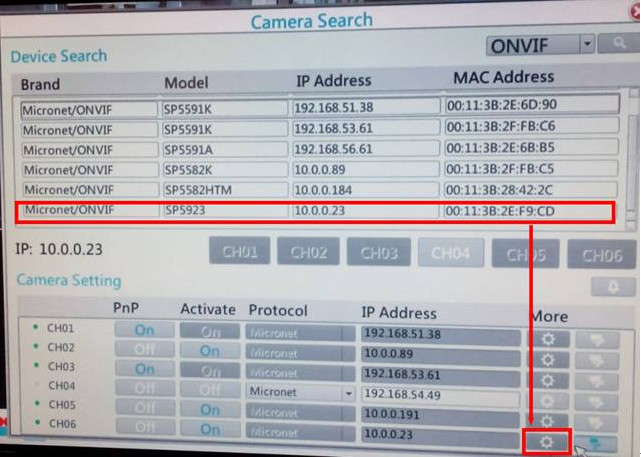
B,On the contrary, the “LAN” port (uplink) should have the connection diagram via the Ethernet switch (SP6526) as below, the IP Camera need mapping the IP address with “Micronet” (if it’s SP5923) protocol to port #1….or #6.
Figure 2
SP5736P Setup:
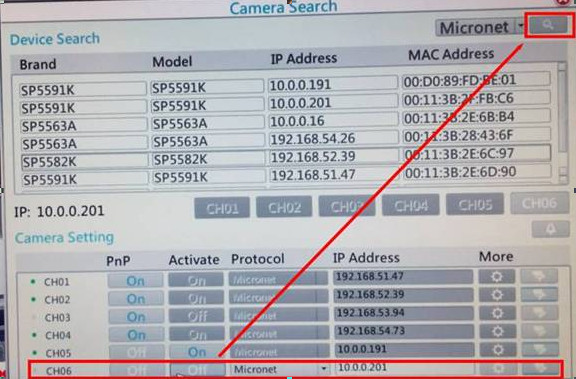
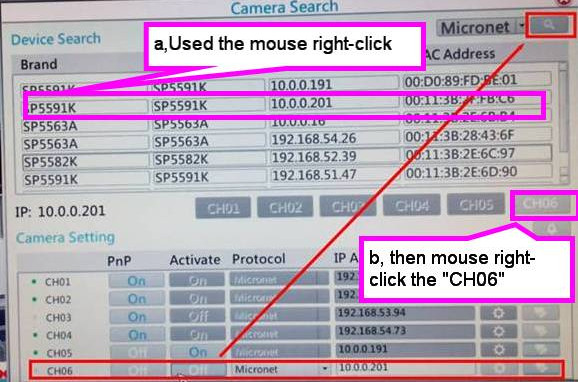
1, For example the IP camera IP address is mapping to the port#6, go to the HDMI Monitor use the mouse click the 
“setup” icon and “Off” the channel 6 “PnP” / “Activate” setting.
2, “Search” the IP camera then right-click the IP address to the channel number which “PnP”/”Activate” is disable.
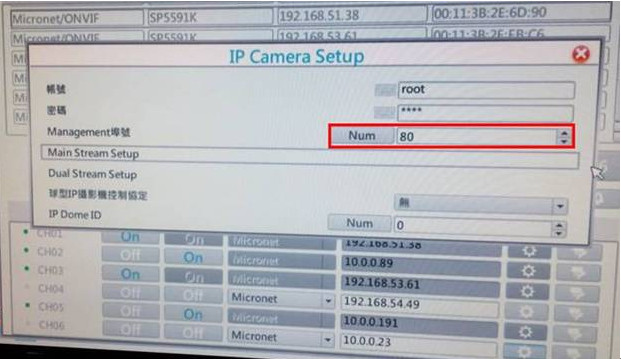
3, If the HDMI LCD the video stream is black when “On” the CH06 “Activate”, please check  “system info” as following “system info” as following
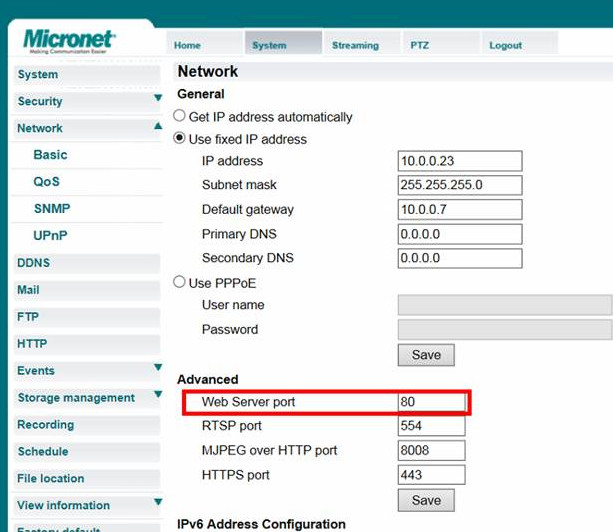
4, Is the http port “80” the same as SP5923 WEB UI http port?
SP5923 WEB UI setting
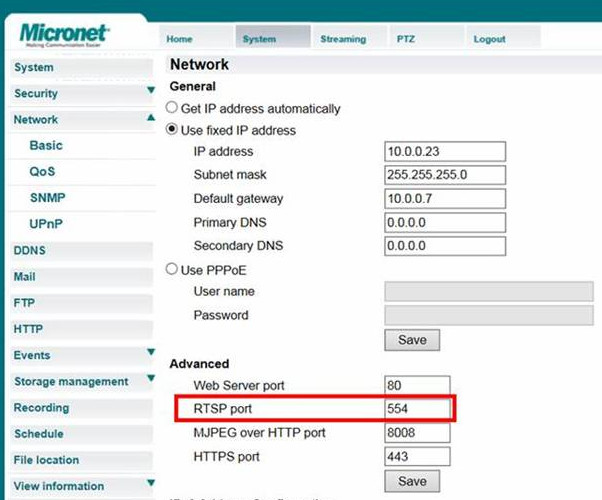
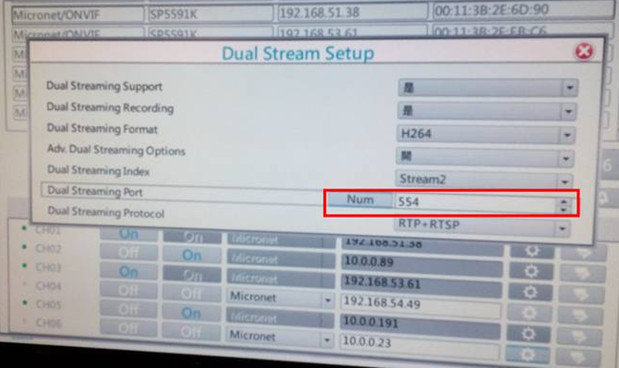
5,Is the streaming port (Main stream setup/Dual stream setup) “554” the same as SP5923 WEB UI rtsp port?
6, SP5923 WEB UI Video stream setting as below
We connected SP5923 camera with Micronet SP6524PWS switch but the camera is not getting ON.
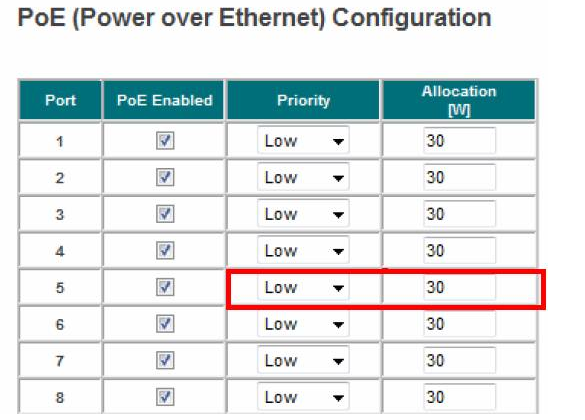
Please set the PoE configuration of the switch with Priority “normal”/Allocation “30” it will supplying the power to
the port based on the order of the priority “Normal” for the SP5923 total power required.
How do I setup NVR(SP5736P) for connect APP?
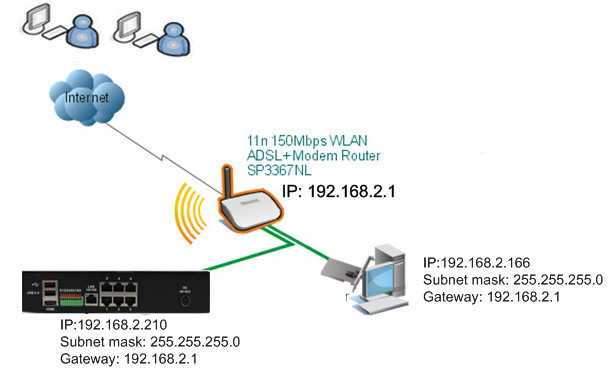
Connect your SP5736P to the router, and use IP search tools to find the IP address of your SP5736P in LAN. You can refer to the following picture to set up your equipments:
STEP1, IP address/web port
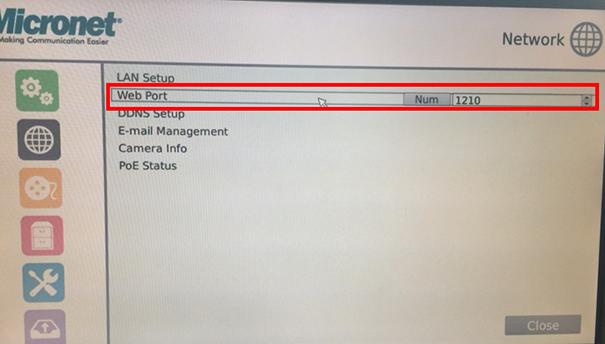
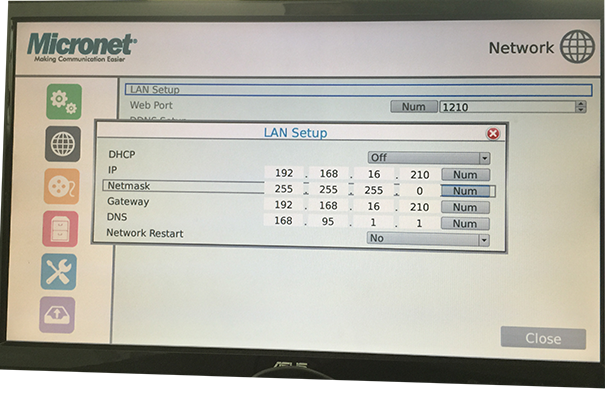
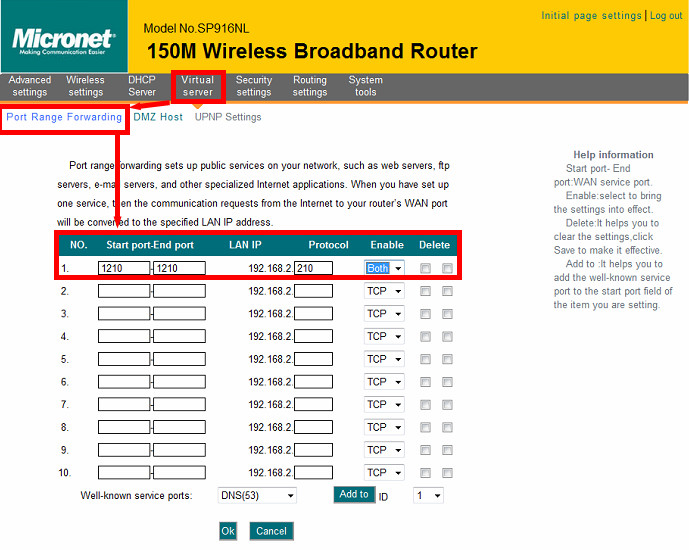
Go to SP5736P local LCD to check the private IP address and web port. The default WEB port is 80. Usually there is no need to change the port number. However some ISP blocks port 80, so you may need to change the port to accommodate it. Here we change it to 1210 for example.
Step 2/Local PC access
We can access the NVR using http://192.168.2.210:1210 on local PC.
Then we need to do port forwarding settings on your router. The configuration depends on the router you are using; please consult your router’s technical support accordingly.
For example, you must open ports on router or firewall so you can access NVR from Internet.
A,
- Go to your router’s setup page, and locate ‘NAT’, ‘Firewall’, ‘Port Mapping’, ‘Port Forwarding’, or similar setup item.
-Enable this function, and fill NVR IP address in ‘LAN IP’ (or similar field), select ‘TCP’ or ‘BOTH’ as data type, and input these port numbers for the services you wish to access from Internet:
NVR web configuration and view live image: 1210
Please note that if you changed the port number of web configuration / view, you have to change the port forwarding setting for your router accordingly.
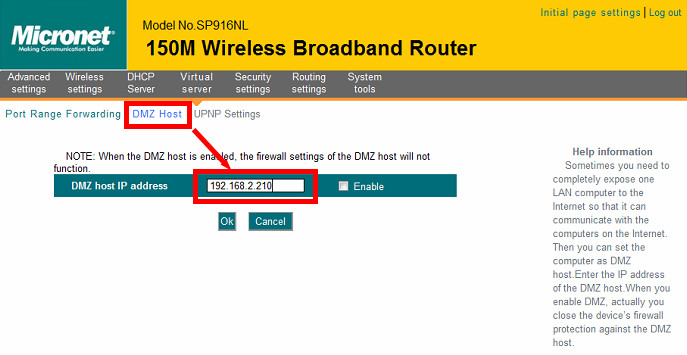
B, If NVR/IP Camera is the only one service you wish to access from Internet, you can also use ‘DMZ’ function to access NVR:
Simply fill the IP address of the NVR and you can access your NVR from the IP address of your router directly.
Step 3/ Remote PC access
Signup for a free Dynamic DNS service: Setting up a dynamic IP address is a great way to easily access your camera if you have a static External/ Internet address. However, if your ISP has allocated a Dynamic IP address then this step is required for you access your NVR/IP camera outside your network. To setup your DDNS, please find attached file for “DDNS QIG-noip.pdf”
Now we can access the NVR using http://public IP address:1210 on internet remote PC and APP.
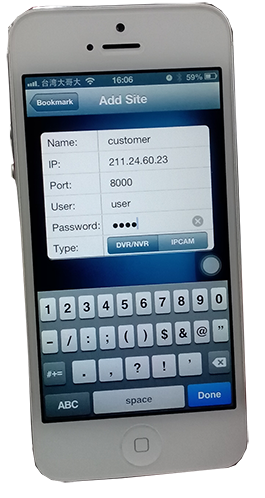
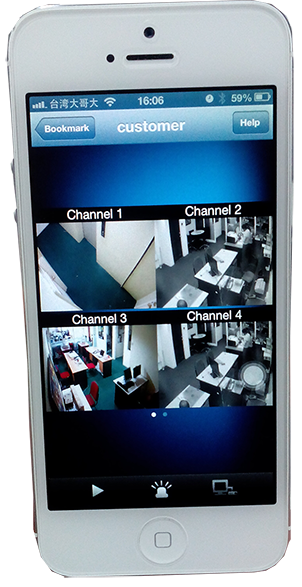
Below example for IPHONE APP “NetGuard” as IP address, port, user, password.
|
|
.jpg)






.jpg)

_1.png)
_2.png)
